Erres KY585 radio (1959)
The Erres KY585 is an upper mid-range model from 1958 in a Bakelite cabinet.
It has AM and FM reception and a number of typical contemporary features.
This is a nice late 1950-ies radio with AM and FM. It has a “piano key” bandwidth switch, luxurious tone control options, light bar tuning indicator and good sound. The valve line-up is:
I acquired this radio in January 2025 through an Internet second-hand site. Actually, I wasn't planning to buy this radio. It came as part of a combination deal. Its condition was awful: smelling of mold, having badly looking corroded brass ornaments, holes in the speaker cloth and chipped paint. There was mold in the cardboard back panel, in the speaker cloth and in the general dust inside.

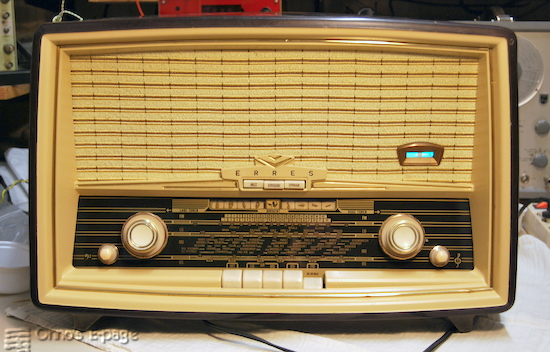
The radio as I received it.
I first treated the cardboard back panel and bottom cover with a bathroom mold cleaning product. That seemed to have some effect: the grey haze covering the letters disappeared mostly. The cardboard back and bottom panels were also warped badly by a long exposure to moist. To flatten them again, I wetted them and squeezed them between a set of boards for three weeks. After drying, I would seal the surface using a spray varnish.
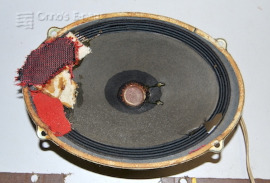
Damaged speaker as removed from the radio.

Old and new cloth after washing the replacement.
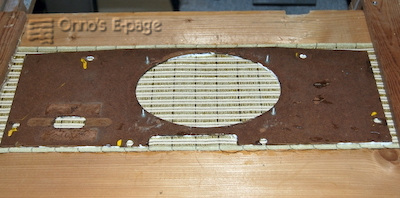
New speaker cloth glued to baffle.
Then I started with the electronics.

The chassis taken out of the cabinet.

Glass tuning scale taken off the chassis.
I removed all valves and connected the power transformer to mains, idling. It didn't run warm and the voltages were all ok, so the transformer didn't seem to have any real damage. It was visible that the isolation between windings wasn't paper but plastic film, so not very sensitive to moist. I removed most of the rust with a steel brush and then sanding paper. After this, I greased it with WD40 to stop the rust. Then I cleaned the chassis and removed rust spots from the frame of the tuning capacitor using a glass fiber brush.
Reforming the main power supply electrolytic capacitor seemed to go well. But the electrolytic near the output transformer was leaky so it was replaced. I checked the output transformer and was able to reconstruct all the connections to it. Then I replaced the paper capacitors. Most of them were really leaky and some of them were in a position to cause damage, such as the capacitor across the output transformer. Fortunately, the KY585 already has a number of polyester and ceramic capacitors that did not need to be replaced.
After putting back the valves, I connected the radio to mains and turned it on. It gave an impressive hum. The voltage on the reservoir capacitor had a tremendous AC ripple indicatig the capacitor was faulty. I had checked its leakage current during reforming, but not its capacity afterward. I found a suitable replacement, a bit taller than the original, made in Germany. The original had the Hunts brand, but the only Hunts replacement I had in store turned out to be leaky and unusable.
Initial curve when wobbling the ratio detector.

Ratio detector transformer taken apart.
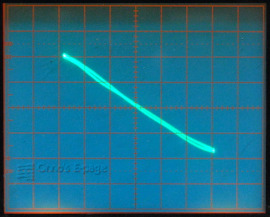
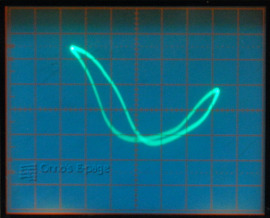
Ratio detector curve after repair and alignment.
Now the tuning cords had to be restored. These were made of cotton or linen and had disintegrated long ago. Initially, shreds of string were lying randomly over the chassis. Lacking information of which pieces belonged together and where they came from, it wasn't possible to just replace the cords. I had put them in a bag to sort out later. The service manual from the the NVHR site showed how the tuning cords and the two cords to move the tone control indicator should run. There was one complication though: my KY585 was not exactly like the drawing in the manual. The guide wheels for the AM tuning cord did not correspond to the diagrams. I compared my radio to drawings of other Erres radios and concluded that Erres had made some design changes which made the string arrangement more like the KY595. The radio's serial number and the production date stamped on the original electrolytic capacitor suggest that it is from a later production series from 1959. Comparing the drawings, I was able to solve the puzzle and reconstruct the length and configuration of the tuning cords and springs and make the mechanism work.
Reconstructed tuning cords for AM.

Diffusion screen, grommets and tuning strings replaced.

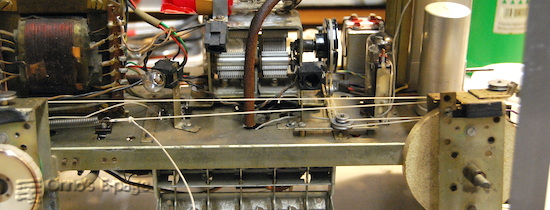
Chassis restored and tuning dial attached.
Now I had to take care of the cabinet. The baffle was already looking well with its fresh new cloth. But the front of the cabinet was chipped and the ornamental rods were corroded.

Close-up of the damage to the front.
Time to repair the damage and repaint the front. First, I needed to remove the brass rods. Each of them had four or five brass tabs soldered to them, that protruded through the front and were kinked behind it to fix the rods. I straightened the tabs to release the rods, which was not so easy because they were sitting in awkward corners. I polished the rods and resoldered some of the tabs that had come loose through my actions.

Brass ornamental rods polished and varnished.
I sanded the front of the cabinet and filled the chipped spots in the painted area with car paint filler. Then sanded again. I carefully masked the parts that needed to remain brown. I found a semi-matt spray paint with the right color and applied the paint. After removing the masking tape and paper, while the paint was still soft and easy to remove, I trimmed away the uneven borders where the paint had crept under the tape.

The cabinet just after spray painting.

Bakelite cabinet after repainting and redecorating.
I mounted the baffle and slid the chassis back in. Then put the bottom and back panels in place.
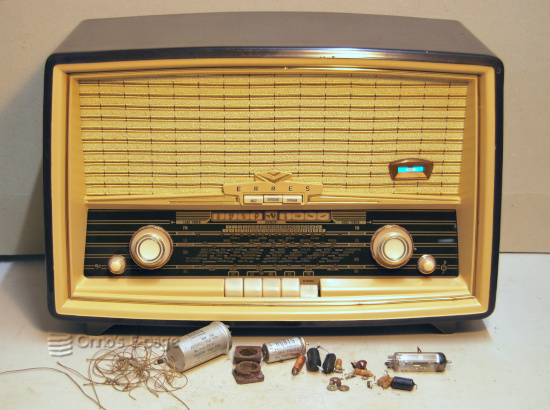
KY585 radio after restoration, with replaced components.
This restoration took a few months, but the result was fine. A clean looking radio that was playing well.
Copyright © 2025 by Onno's E-page published 2025-12-14, last updated 2025-12-16 , edited 2026-03-07